Riscure RHme2 is finally over! What a marathon CTF. I actually spent a tonne of time on this CTF over the past few months, mainly because I had never looked at embedded hardware systems in the past. So I had to gain my skills from never having even used Arduino to performing side channel analysis and fault injection, reverse engineering 8 bit microcontroller binaries, and dealing with ever increasing lust for more and better hardware hacking tools!
If you don’t know what RHme2 is, it is a hardware based CTF run by Riscure. Around October 2016 Riscure put a call out to anyone interested in playing a hardware CTF to solve an online binary reverse engineering challenge. Solve the challenge and enter the competition and Riscure ship you a competition board to play on. The competition board is actually based on a clone of the Arduino NANO. So an 8bit, 16mhz ATMega328p MCU. Onboard each device though is a secret bootloader that decrypts firmware in flash memory so you can’t trivially reverse engineer all of the challenges. You’re main option is to attack them on the hardware. Sounds fun!
In this writeup I will discuss how I solved Secret Sauce, an “Other” category challenge which means just that it stood alone, not exactly fitting into any of the “Exploitation”, “RE”, “Crypto” or other categories on offer. The clue was:
So not super descriptive but one thing that stands out to me is the sentence:
the Pure Software Exploitation Team applied all the tricks they have but did not find any way to guess the secret password
Ok so we’re going to need to get more creative than simple brute forcing here. Let’s take a look at the challenge by flashing to the hardware.
root@kali:~/rhme/secretsauce# ../flash.sh secretsauce.hex
avrdude: AVR device initialized and ready to accept instructions
Reading | ################################################## | 100% 0.00s
avrdude: Device signature = 0x1e950f (probably m328p)
avrdude: NOTE: "flash" memory has been specified, an erase cycle will be performed
         To disable this feature, specify the -D option.
avrdude: erasing chip
avrdude: reading input file "secretsauce.hex"
avrdude: input file secretsauce.hex auto detected as Intel Hex
avrdude: writing flash (12672 bytes):
Writing | ################################################## | 100% 14.67s
avrdude: 12672 bytes of flash written
avrdude done.  Thank you.
Immediatly just upon flashing it I notice the size of the firmware in bytes. 12,672 bytes is very large for a simple password algorithm program. There’s gotta be something to this. Let’s connect via serial and check it out.
root@kali:~/rhme/secretsauce# ../miniterm
--- Miniterm on /dev/ttyUSB0  19200,8,N,1 ---
--- Quit: Ctrl+] | Menu: Ctrl+T | Help: Ctrl+T followed by Ctrl+H ---
Welcome to Secure Encryption System(SES)!
Authentication step.
Input provided secret password.
If you lost your password call the customer service.
>
Ok “Secure Encryption System” eh. I try a few passwords:
Authentication step.
Input provided secret password.
If you lost your password call the customer service.
>blah
Checking password...
Password is incorrect!
>blah2
Checking password...
Password is incorrect!
>1123441231
Checking password...
Password is incorrect!
>
Ok one thing to note is it returns extremely fast and gives me infinite attempts on the password. This is interesting but we know to rule out brute force from the clue.
To be honest, I struggled for a few days to think of what vector to take. Until one day I decided to try typing a few more passwords in. As I did that I noticed that sometimes the response from the serial line was delayed. I later realized this is not related to the challenge, its just a result of connecting to a device over a USB Uart, sometimes packet processing is sluggish. But it got me thinking about timing attacks.
A timing attack is a type of side channel attack where you can learn something about the internals of a black box system by simply timing how long it takes to process an input you control. That’s cool because we control the input. But how do we time something at this scale? I already mentioned the processing is really fast.
By this time in my RHme2 journey my house had already collected a few new other microcontrollers. One was a very similar device, another clone of the Arduino NANO along with breadboards and associated gear. I had learned to code basic stuff for the Arduino so I thought it might be a good idea to perform the timing on an Arduino. Using the PC serial port might have worked, but we see later than having low microsecond amounts of resolution was necessary and I don’t know if a PC serial port would work.
I wired my Arduino together with the RHme2 board as such:
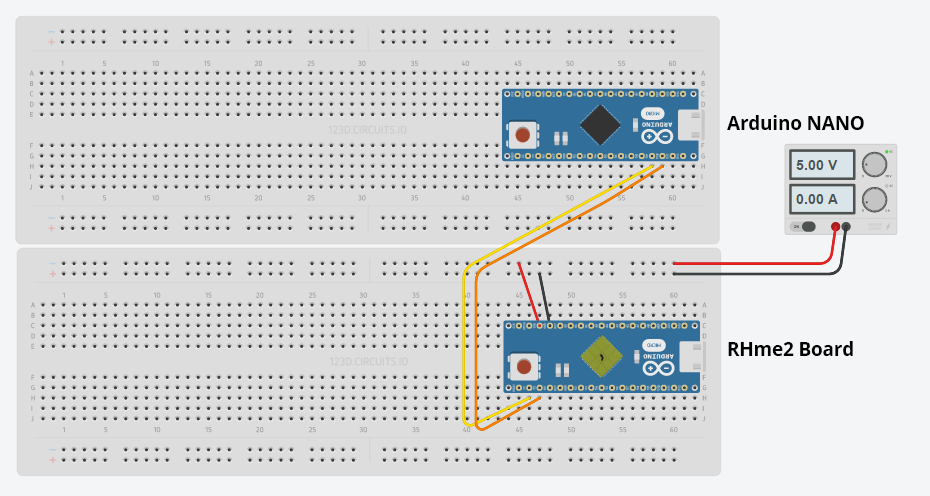
Which is simply powering the RHme2 board from an external 5v DC power supply while controling the serial input (RX, TX) GPIO pins from my second Arduino. I then wrote and flashed the following Arduino Sketch to my little attacking Arduino with the goal of timing the response of the RHme2 board to different length passwords.
/*
 * SecretSauce attack. Data collection for password length by dacat @ Capture The Swag
 */
#include <SoftwareSerial.h>
SoftwareSerial rhmeserial(10, 11); // RX, TX
String rhmedata;                  // Buffer to store data incoming from the RHme2 board
bool readynext = true;            // Flag to indicate if we're ready to try the next password
unsigned long timer;              // Somewhere to store the microseconds timer
unsigned long timedelta;          // Somewhere to store the microseconds delta
int count       = 0;              // keep track of what to add to alphastart
int maxlen      = 20;             // Maximum length of the password to collect data about. This is a guess.
int rounds_per_len = 100;
char current_pw[22];              // Store the current pw we're trying here using sprintf plus \r plus \x00.
void makepw(int pwlen, char *pw) {
  int i;
  for(i=0; i < pwlen; i++) {
    pw[i] = 'A';
  }
  pw[pwlen] = '\r';
  pw[pwlen+1] = 0;
}
void setup() {
  Serial.begin(115200);     // Open serial communications for PC for monitoring only.
  rhmeserial.begin(19200);  // set the data rate for the RHme2 board
  makepw(maxlen, current_pw);
}
void loop() {
  // If we're ready to try the next character
  if(readynext) {
    readynext = false;                  // lower the flag

    Serial.print(maxlen);               // Note it to the serial port for data collection

    rhmeserial.write(current_pw);       // send the password
    timer = micros();                   // begin the timer!

    count++;                            // move along to the next char in the alphabet
    if (count > rounds_per_len) {
      count = 0;                        // reset to 0, do it again.
      maxlen--;
      makepw(maxlen, current_pw);
      if (maxlen == 0) {
        Serial.println("Finished.");
        while(Serial.available()==0) {}
      }
    }
  }
  // Handle incoming response from the RHme board
  while(rhmeserial.available()) {         // while the RHme serial port has data available
    char c = rhmeserial.read();           // get a byte from the RHme serial
    rhmedata += c;                        // concatenate it with the string so far
  }
  // If we got a response, is "incorrect" in it?
  if(rhmedata.length() > 0 && rhmedata.indexOf("incorrect") >= 0) {
    timedelta = micros() - timer;
    Serial.print("\t"); Serial.println(timedelta);   // Send result to PC for data collection.
    rhmedata = "";                       // Reset the string to null, we're done with that data.
    readynext = true;
  }
  // If our Arduino NANO wants to reply , then reply.
  if (Serial.available()) {
    rhmeserial.write(Serial.read());
  }
}
When we attack the Arduino we get tab delimited time data. We have the Arduino repeat the experiment 100 times per password length so we can get a statistically interesting data set. It looks like this on the USB uart output:
25  44152
25  44108
25  44080
25  44156
25  44080
25  44152
25  44080
25  44160
25  44080
...
1  45292
1  45300
1  45244
1  45232
1Finished.
So it seemes like our inputs take around 44,000 - 45,000 microseconds to process. Quite a long time in CPU terms. Since our collected data is large, I decide to inject it into Excel to analyse visually initially. Immediately I am surprised to see the graph:
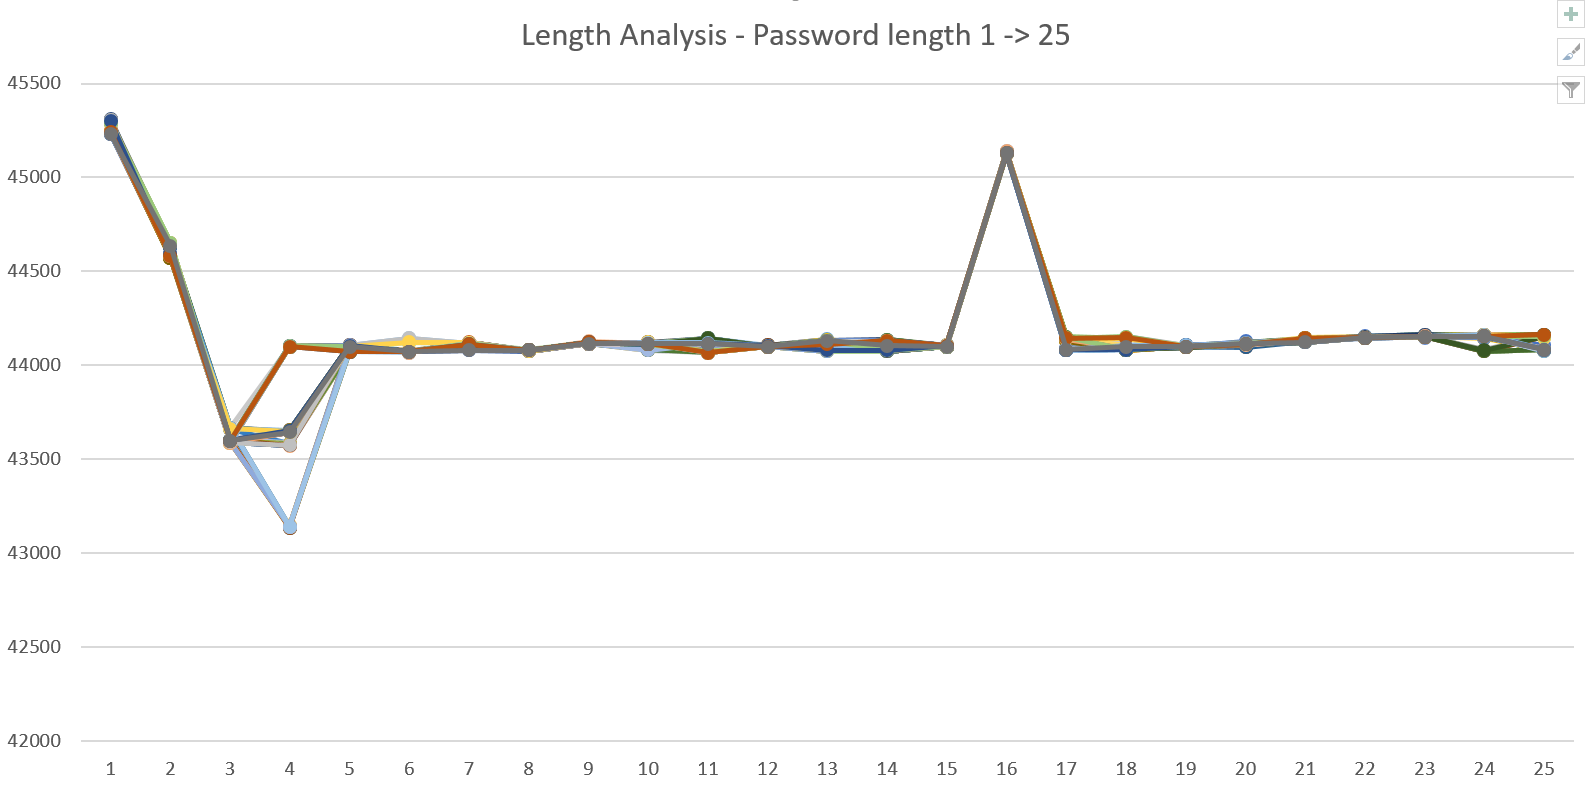
Firstly we see odd behavior at low lengths but a distinct peak at 16 bytes. The starkness of the peak gives me the impression that the password is probably 16 characters and the MCU is spending a lot more time analyzing such passwords. This also tells me that a password length check is probably occurring before any bytes of the password itself are checked. This means everything we send needs to be padded to 16 bytes. Good to know!
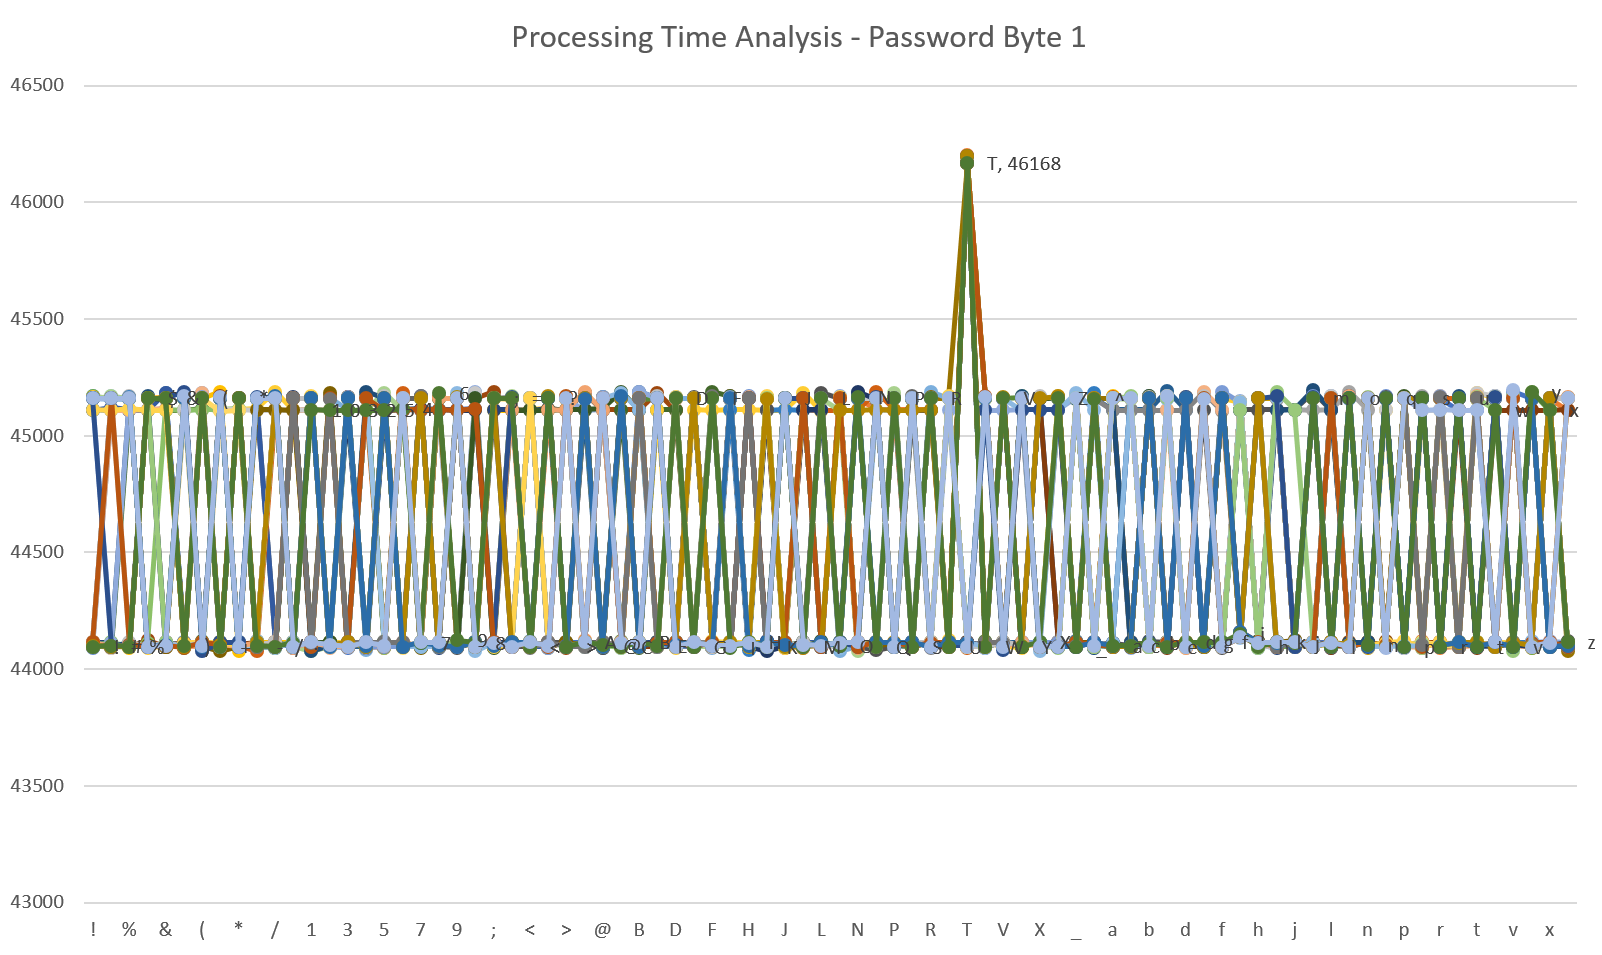
I modify the sketch to send padded passwords, mutating each byte and collecting data. I find similar results doing this to above. I use Excel for a few more bytes to confirm my methodology. Here’s an example for password byte 1, we see the peaks for the input byte “T”:
After some time I decide to instead write some Python code to perform the data analysis so I can give Excel a rest:
 #!/usr/bin/python
import sys
import string
def count_with_error(lst, num , err=50):
    c = 0
    for i in lst:
        if i > (num-err) or i < (num+err):
            c += 1
    return c

if len(sys.argv) < 2:
    print "Usage: ./process.py <datafile>"
    quit()
datafile = sys.argv[1]
# input data looks like
# [pw   ][pad   ][\t][usec ]
# pwbytes~~~~~~~~    444112
data_raw = [x.strip() for x in open(datafile).readlines() if len(x) > 1]
pos = data_raw[0].index('~')-1
# dictionary of data with a schema like:
# {char : [t1, t2, t3, ... tN]}
data = {}
for d in data_raw:
    k = d[pos-1]
    v = d.split()[-1]
    # if its not microsecond data skip this row
    if not v.isdigit():
        continue
    if k not in data:
        data.update({k:[int(v)]})
    else:
        data[k].append(int(v))
maxes = {}
for d in data:
    m = max(data[d])
    maxes.update({d:max(data[d])})
f = max(maxes, key=maxes.get)
h = count_with_error(data[f],maxes[f])
print "[*] Computer says pos",pos+1,"is",f
Which operates in the Sketch output data that looks like this:
N~~~~~~~~~~~~~~~        45160
O~~~~~~~~~~~~~~~        44096
P~~~~~~~~~~~~~~~        45160
Q~~~~~~~~~~~~~~~        44096
R~~~~~~~~~~~~~~~        45164
S~~~~~~~~~~~~~~~        44096
T~~~~~~~~~~~~~~~        46168
U~~~~~~~~~~~~~~~        44100
V~~~~~~~~~~~~~~~        44112
W~~~~~~~~~~~~~~~        44096
X~~~~~~~~~~~~~~~        45164
Y~~~~~~~~~~~~~~~        44096
And gives nice results like:
root@kali:~/rhme/secretsauce/data# ./getbyte.py 3.txt
[*] Computer says pos 3 is I
root@kali:~/rhme/secretsauce/data# ./getbyte.py 5.txt
[*] Computer says pos 5 is m
After working on these data collection and analysis phases we were finally rewarded with the complete password: TImInG@ttAkw0rk Nice! Time for our flag right?
NOPE.
Welcome to Secure Encryption System(SES)!
Authentication step.
Input provided secret password.
If you lost your password call the customer service.
> TImInG@ttAkw0rk
Checking password...
Password is correct!
************************************************
Authentication complete. Welcome to the system!
Now you can encrypt messages up to 32 bytes.
Input data to encrypt:
> NOPE
True Random Nonce:    d32e857d9d6dac6afe81d7a84f771
Encryption:    a3c588dc4210199e16066711838204fd53bfa084d141439e104cd3dff4236
Input data to encrypt:
We had successfully beaten phase 1 of the challenge. We had recovered the password but now we’re faced with an unknown encryption system and even more unknown way to recover a flag. Let’s go on to Phase2.
Phase 2: Breaking the Encryption System
Ok lets put our unknown encryption system hats on. What DO we know? Well lets try some chosen plaintexts and check the outputs. I’ll choose these:
- Null twice (i.e. just hit enter two different times)
- AAAA
- AAAAAAAAAAAAAAAA (16 x A)
- AAAAAAAAAAAAAAAAAAAAAAAAAAAAAAAA (32 x A)
Input data to encrypt:
>
True Random Nonce:    321a1f9e9dc6cd04ad06864d6859d96d
Encryption:    df6f66327a01c5a67ddb41b09ee03
Input data to encrypt:
>
True Random Nonce:    60e47767c6a59f08eade2d3e1ae5a
Encryption:    cc71b97035f9c240b18eedce6223e
Input data to encrypt:
>  AAAA
True Random Nonce:   3bacfb574aa74a93d85a2c477ced0b
Encryption:    d574dd4be1844316c572cbffe930a1fa91cce7e9eb5d577e524eb3a48b78b
Input data to encrypt:
> AAAAAAAAAAAAAAAA
True Random Nonce:    0a133251e0f724c81b4b1e4d0ed02
Encryption:    844329eb23ca1957370668bf44ee695866ad81fb57b6422f275e11610540a
Input data to encrypt:
> AAAAAAAAAAAAAAAAAAAAAAAAAAAAAAAA
True Random Nonce:    3deedbf89c0c7db178cb44001f1b077b
Encryption:    ab460d498ded8570b01249dae22e69fe32dc9442097c50751bd313fa211036878d2bc5da00037055a9d2d90ab419d
Interesting. Both null inputs gave short outputs but both are different. This “True Random” nonce is likely a factor and is pretty annoying. The other strings seem to increase in blocks indicating some kind of block cipher or padding going on.
Let’s look into the True Random nonce. On Arduino there is not too many ways to generate “true” random data. One library is published with the goal of achieving this and is coincidentally named “True Random”. It’s published here: https://github.com/sirleech/TrueRandom
Let’s read how it achieves random number generation:
Introduction
TrueRandom generates true random numbers on Arduino. They are different every time you start your program, and are truly unpredictable unlike the default Arduino random() function.
Compatibility
TrueRandom currently functions on the Arduino Diecimila, Duemilanove, 168 and 328 based Arduinos. It does not yet function on the Arduino Mega. TrueRandom uses Analog 0. Do not connect anything to this pin. These restrictions may be removed in future versions of this library.
How suspicious, what is it doing with Analog pin 0? The truth is, True Random is only able to product random numbers if the configured analog pin is left as a floating voltage. If this pin is pulled to some fixed value, say, ground, then there is no more randomness. Let’s try this idea out on the RHme2 board.
Trying A0, A1, and A2 I got no improvement. But grounding analog pin 3 (A3) gave me a significantly different behavior. Now when encrypting null plaintext my result is:
True Random Nonce:    66e94bd4ef8a2c3b884cfa59ca342b2e
Encryption:    477f2b3a34053f76d12ec42bea36a095
Input data to encrypt:
>
True Random Nonce:    66e94bd4ef8a2c3b884cfa59ca342b2e
Encryption:    477f2b3a34053f76d12ec42bea36a095
Input data to encrypt:
>
Consistent nonces with consistent ciphertext! Nice. Now we can try perhaps some more cipheranalysis that does not need to factor in a random nonce. The next thing I want to try is encrypting longer plaintexts to see the consistency of the output and how it looks. We noted before different length outputs in blocks of 16 . Let’s see what that is about?
Looking into this I found that encrypting 16 byte and 32 byte length plaintexts results in bumping the ciphertext output. So this appears to be a padded or a block cipher of some kind.
Next I decided to test re-encrypting the ciphertext. I use the following code for a few experiments:
from pwn import *
import sys
plaintext = sys.argv[1]
print "[*] Ensure pin A3 is grounded."
r = serialtube(baudrate=19200, port='/dev/ttyUSB0', convert_newlines = True)
r.recvuntil('>')
print "[*] Sending password..."
r.sendline('TImInG@ttAkw0rk')
r.recvuntil('>')
r.sendline()
r.recvuntil('>')
plaintext = plaintext.decode('hex')
r.sendline(plaintext)
result = r.recvlines(4)
ciphertext = result[2].split('\t')[1]
print "[*] Plaintext: " + repr(plaintext)
print "[*] Ciphertext: " + ciphertext
r.close()
root@kali:~/rhme/secretsauce# python enc2.py 41414141414141414141414141414141
[*] Ensure pin A3 is grounded.
[*] Sending password...
[*] Plaintext: 'AAAAAAAAAAAAAAAA'
[*] Ciphertext: d183d6929f7188dc98020c82efc288d599c338e3d364f692dc3322a6c4c00d0f
root@kali:~/rhme/secretsauce# python enc2.py d183d6929f7188dc98020c82efc288d599c338e3d364f692dc3322a6c4c00d0f
[*] Ensure pin A3 is grounded.
[*] Sending password...
[*] Plaintext: '\xd1\x83\xd6\x92\x9fq\x88\xdc\x98\x02\x0c\x82\xef\xc2\x88\xd5\x99\xc38\xe3\xd3d\xf6\x92\xdc3"\xa6\xc4\xc0\r\x0f'
[*] Ciphertext: 41414141414141414141414141414141d7bdbce9ea35f6eb086d89e844b5b3b3d5e662db171f095ef60f19ed67341c35
Nice! So the algorithm here works forwards and backwards. So… XOR? Padded to 16 bytes? Probably because the XOR key is 16 bytes? Sounds likely. 16 bytes is a nice length for a flag too. Maybe the flag is the XOR key? Should be easy, we just need to encrypt 16 bytes of \x00 to find the key.
root@kali:~/rhme/secretsauce# python enc2.py 00000000000000000000000000000000
[*] Ensure pin A3 is grounded.
[*] Sending password...
[*] Plaintext: '\x00\x00\x00\x00\x00\x00\x00\x00\x00\x00\x00\x00\x00\x00\x00\x00'
[*] Ciphertext: 90c297d3de30c99dd9434dc3ae83c99499c338e3d364f692dc3322a6c4c00d0f
Cool nice. The first 16 bytes (90c297d3de30c99dd9434dc3ae83c994) should be the XOR key. We give it a try but its not the flag. Sad face…
Next I focus on the fact that our output being 32 bytes for 16 input bytes is weird and still unexplained. The software seems to be appending some non-null string to our input before encrypting it. We can learn what it is by going back to our null encryption test. When we sent nothing earlier we got this result:
root@kali:~/rhme/secretsauce# python enc2.py ''
[*] Ensure pin A3 is grounded.
[*] Sending password...
[*] Plaintext: ''
[*] Ciphertext: 477f2b3a34053f76d12ec42bea36a095
At this point I feel like I may have an idea of the algorithm in use here.
ct = pad16(pt + flag) ^ key
Since we can force the pt to be null we can remove it from the equation. We also know from before that we can run the algorithm both in forward and reverse then we should be able to recover our flag by simply:
root@kali:~/rhme/secretsauce# python enc2.py 477f2b3a34053f76d12ec42bea36a095
[*] Ensure pin A3 is grounded.
[*] Sending password...
[*] Plaintext: 'G\x7f+:4\x05?v\xd1.\xc4+\xea6\xa0\x95'
[*] Ciphertext: d7bdbce9ea35f6eb086d89e844b5690199c338e3d364f692dc3322a6c4c00d0f
Our flag being the first 16 bytes of this ciphertext: d7bdbce9ea35f6eb086d89e844b56901
We try it on the website and it’s right! Another challenge solved!